Saturday, 16 November 2013

Methods to block websites on your computer

Blocking any website on your computer becomes necessary when you really want to make it your personal computer. Many times someone from your family or some irritating friend comes to you and want to use your computer to surf internet and then he start viewing videos on youtube or start chatting on Facebook regardless of whether you are liking it or not but you cant even ask them to leave.

Block-a-Website


Of course you never want that anyone use your computer for long time and keep using your internet while you just sit aside them to see what they are doing. 

You can simply block the sites and prevent them from opening in your system to get rid of this problem. And i have already given post about how to acces blocked website.Get it from the below link

How to Block Websites on your Computer

There are certain Tricks to block a website from opening on your system :

Method 1 : Using Windows host file


For this method , you don’t require any additional software to be installed on your computer. All you need is a little bit knowledge and some basic file editing capability using notepad. Windows has this host file to map the ip addressesand host names of the host sites to your computer.

By using this trick you can make your computer to redirect again to your local machine instead of opening that host site. So for blocking any website using windows host file you need to follow some steps as given below :

Step 1 :

Open “C:\Windows\System32\drivers\etc” in the Windows search bar or navigate to the folder by clicking your way through Windows Explorer.

Step 2 :

Now after reaching to this path you will see a file named Host. Right click on that file and click on open with notepad.

Step 3 :

In Notepad, you will see several lines of text used for mapping purposes. Go to the last line of text (it should say something regarding a local host), now press enter to move the cursor to the end of the file then type “127.0.0.1″ (without codes)and press the spacebar.

Step 4 :

Now, type the specified address of the website you wish to block on the same line. For example, type “127.0.0.1 www.reddit.com” , “127.0.0.1 www.facebook.com” to block all these sites.

Step 5 :

Now Save this file and ignore if you receive any messages showing you warning about this modifications.

All set here. Now you can go to your browser and verify that the site you want to block isn’t opening anymore.


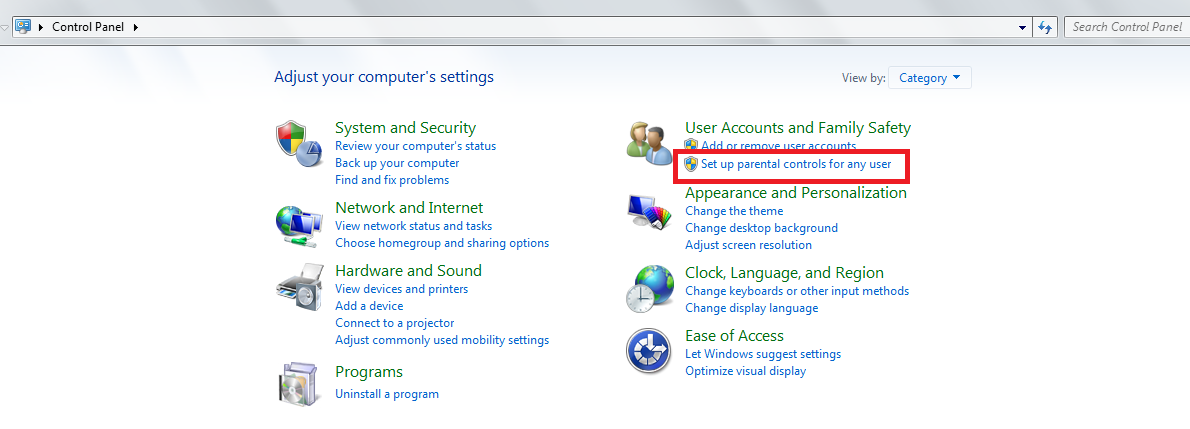
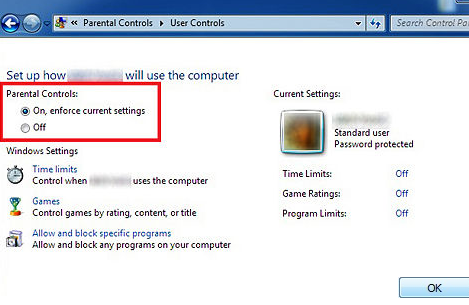
Method 2 : Using control Panel

If you don’t wish to block sites using this host file or there is some problem in modifying that file , so you can do the same thing using another default function of windows i.e. Control Panel Parental Control.

For doing this , just follow a few steps given below and you are done :

Step 1 :

Click on start button > Go to control panel > User accounts and Family safety > Set up parental control for any user.


List of all the users in your system will be displayed .

Step 2 :

Now select the account for which you want to set the web filter and then under parental controls , click ON.


Step 3 : Click on web filter.

Step 4 : Click on Block some websites or contents .

Step 5 : Click on Edit the allow and block list.

Step 6 : In the Website address box, type the address for the website that you want to allow or block, and then click Allow or Block.


These two are the Easy and working Methods to Block websites on your Computer.

This is all guys. Hope you like my post. Please give a comment about this post.Thanks

Saturday, 16 November 2013 by Unknown · 0

Sunday, 10 November 2013

Increase RAM speed using notepad.

Hi friends, In this post you will know a trick to speed up ram by using Notepad. You might have lot of problems sometimes that your computer not responding. You can use this trick and avoid that. And it's an easy task to do.


Lets start the process for how to increase speed
  • At first open notepad.
  • Then type the code bellow.
  • FreeMem=Space(64000000)
  • Now save the file as ClearRam.vbs  

That's it. Open the file (double click) and you are done..


Sunday, 10 November 2013 by Unknown · 0

Saturday, 9 November 2013

Tricks to Speedup Your Pendrive.


Pen drives or USB are quite popular in the digital world for instant transfer of data. Using USB flash drives, one can easily transfer large files from one PC to another, from PC to laptop, from laptop to TV, and vice versa. This latest technology has made our work easier than before. In current times, you can move Gigabytes of information into just a tiny pen drive within few seconds.

speed up your pendrive


In recent years, a lot of changes has been made in storage devices. When you compare new pen drives with the older ones, you will notice a considerable high transfer rate in the latest ones. However, there are times when you can get irritated with slow transfer speed of pen drives while copying data in pen drives. Well, this article shall provide you with some tricks using which you can speed up transfer rate of your pen drive.

Factors responsible for data transfer rate:

Before knowing the tricks, we shall have a look at some factors responsible for data transfer rate , and they are as follows.

1.Pen drive ageing: Well, this is common for any device that when it becomes old, the rates gets slower.

2.Type of files: The transfer rate of data also depends on the file type; you might have noticed that songs, videos and documents take very less time in transfer while application files need more time.

3.USB port version: The most popular version of USB is 2.0, and it will give you 35mbps speed. So, if you want fast speed then buy 2.0 version pen drives.

Few tricks to Speedup your pendrive Data Transfer Rate:

1.File system should be NTFS: If you want to Speedup Your Pendrive, then make sure you have NTFS as file system. You can do so by Right clicking on your pendrive and selecting Format,Select NTFS File system, Uncheck Quick Format And Click On Start.

2.Disk errors: To check disk errors go to the properties tab of your pen drive, then select ‘tools’ tab. You will find a ‘check now’ button, click it and then hit ‘start’ to fix the errors. The time taken for scan depends on the size of the pen drive.


speed up your pendrive


3.Device policy: Under properties of your pen drive, select ‘hardware’ tab. Then select USB device from there that will lead you to a pop up window where you need to change settings. You can even have better performance of pen drive by clicking the option under ‘hardware’ tab.

4.Format: This is one of the effective options that many users have tried. When you have used your pen drive for quite a long time, you can speed it up by formatting the device.
The above mentioned were few tricks though big advantages for the speeding of your pen drive. Carefully test your pen drive with the factors given above, and then follow the tricks to Speedup Your Pendrive to a greater extent. In addition to this, you should keep checking for these aspects regularly, say twice or thrice in a month


I hope you like my post.Comment if you have any Queries............

Saturday, 9 November 2013 by Unknown · 0

Thursday, 7 November 2013

How to format an unformatable Pendrive

Formatting is a valuable and essential tool when dealing with any type of storage disk and can help to solve a lot of errors and headaches. But what do you do if your USB flash drive needs to be formatted but, every time you try through the property menus it comes up with an error, or won’t even recognise the drive properly at all. Don’t despair because here is something you can do.

formatting unformatable pendrive


Formatting an unformatable Pendrive is a common process that may need to be undertaken quite frequently, but unless you have gone through this procedure before it can be a mine field.And Ihave also posted about about the how to use pen drive as bootable pendrive to instal OS.check it here
The last thing you want is to finish the process and end up with an unusable pendrive .

Here is a quick step by step guide to Format an unformatable Pendrive

Formatting using CMD:


This guide formats your flash drive as FAT32, to format as NTFS simply substitute the term in the command box. FAT32 is the recommended formatting style by this guide but many do prefer NTFS.

Step 1. Turn on computer as normal

Step 2. Once you are in your desktop insert Pendrive into USB port

Please note: if you know the letters associated with your disk locations or can use a utility such as disk part to list this information then skip steps 3 and 4

Step 3. Go into my computer (accessible from the start menu or desktop) and look down the navigation panel on the left hand side, this lists down to the popular and root menu folders and locations on your computer.

Step 4. Your Pendrive should be listed in one of these locations, it may be referred to by brand, as portable storage or something similar. Next to this label will be a letter,

for example “G: removable storage device ” if the device does not show up you may need to test the port to find the letter with another USB device. This letter needs to be written down or remembered in order to complete this process.

Step 5. Go to the windows start menu, click start or the Windows symbol depending on your edition of Windows, then click run.

Step 6. Type cmd into the run dialog box and click OK, this is to start the command prompt window from which you will be able to choose your format style and name your drive.

Step 7. Then the command prompt window is opened and you will need to type “ Format G: “ 


if you want to Format it as FAT32 then type “ Format G: /FS: FAT32 ”


Step 8. The G in this instance refers to our example Pendrive location, instead you would enter the letter that you remembered or wrote down from the my computer side panel
After you have typed the above command press enter.

Step 9. Here, you will be asked to press enter again and then to give a name for your drive. Follow these prompts then click on enter again.


You have completed the process; go back into my computer to check that the formatting has been completed successfully.And you can use USB as RAM in computer. check it here

Please share it with your friends and give comments if any queries........ thank you.

Thursday, 7 November 2013 by Unknown · 0

Friday, 1 November 2013

SEARCH ENGINE OPTIMIZATION IDEAS AND TRICKS

Many find the usage of search engine optimization very confusing and tough to understand. Nevertheless it truly shouldn’t be. If you have the proper guidance, you will know the tools needed and how you can use them. This will optimize your website and boost the site visitors. Preserve reading through these SEO tricks and then the secrets will show itself.

search engine optimization


Avoid utilizing Javascript. Your content material will likely be extremely search friendly for search engine spiders. Now when you have to use Javascript within the photos links or menus for reasons you can not avoid, then contain the same links as text on the webpage so it will be less difficult for the SE spiders to locate and index the hyperlinks.

Although you could disagree but Don’t just go with significant search engines. There are lots of other link sites that are set up towards certain directories. These can be employed towards your benefit given that they target a specialized audience. Locate the SE that target your specific niche and then attack it. You’ll find constructed to optimize your consumer base.

Place your self as a professional in the market. This could be a lucrative internet marketing concept. Creating a site that’s developed around a niche of buyers is very essential, then use the Search Engine Optimization tools to help the purchasers or prospect locate the products or services you’ve got to provide. Bear in mind, supply what your clients want and usually do not assume what they want.

You’ve got to understand regardless of whether your efforts are paying off for optimizing your websites efficiency inside the SE. You do that by monitoring your page rank by means of a plugin which could be installed in your google toolbar. It’s vital to monitor what keywords and phrases your guests are getting into to discover your website. You ought to know how to do your Keyword study particular for your niche or your website. Copyright your website! By performing that every person will realize that the content in your site is truly your personal. Search engines take this into consideration for their rating levels, Additionally, it adds a rapport with your clients. People will trust you and since your content material is special and fresh, it aids the credibility along.

Take into consideration thinking about all the synonyms for the key phrases and phrases you might be operating to catch-all of the relevant search queries. In case you are not certain of which words to make use of, try to discover the keyword with a tilde (~) in front of them. For example, ~Fishing will provide you with a selection of keywords.

Setup a method to discover the inbound link for your website, specially from relevant, higher ranked Internetsites. Obviously, everyone’s objective is always to find a way for Wikipedia, most likely the most extremely high ranked website of all, to send us it is link juice. Your objective has to be to find other websites whose subject is in sync with yours to provide you the Page Rank boosting.

In the event you strategy to utilize flash inside your website, use just one. Many of these will take away the concentrate out of your description and world wide webtransfer, also, there is certainly no specific advantage for your search engine optimization. A single flash animation is greater than sufficient to make a modern aura for the website.

It’s completely important for you personally to hyperlink your site to other sites which are related when it comes to content. Should you link the contents that are unrelated, then SE will contemplate your website to become of a poor quality and will not allow you to rank high on the results web page.

A misconception individuals feel are “SEO tricks” is the use of a .com in the web site extension They feel it’s really crucial for search engines. But it’s not! SE don’t have any preference on the extensions of one’s website. In reality the other extension like .information or .net perform equally fine and also saves you money.

Invest on Pay-per-click (PPC) marketing and advertising campaign. It’s often stated, you’ll need to spend cash to earn money and PPC is among the greatest avenues for it. Bid on the search phrase that is related to your niche. This can be among the SEO tricks that could aid position your site within the SE, specially for terms exactly where you do not have a stance in organic site visitors.

As pointed out earlier, search engine optimization will not need to be confusing. Now which you have read via some of the SEO tricks you would wish to implement some tips to boost your website.

Check out this Google SEO guide on some of this even more underground secrets revealed. You need to know some these more interesting SEO TRICKS to take you to another level.

Friday, 1 November 2013 by Unknown · 0

Monday, 28 October 2013

Improve Your Blog Loading Speed

Hello friends. I know lot of you who have blogs or website are struggling with loading time of your blog or website.Loading time of your website or blog is one of the important factors influencing search engine optimization, which when is too slow could take the reader away from your website and move onto the next, thus indirectly affecting your page ranking as well.And slow internet connection is also one of the problem. For those who have slow internet connection can increase internet speed by little bit i.e 20% by Visiting Increse your internet speed by 20% 

Some of the factors affecting the loading speed are the presence of Java Scripts and the lack of use of web-optimized images. So here i'm gonna post about some tricks to improve your site speed. 


Follow the tips and tricks discussed here for improving the loading time of your web or blog.

1. Cache your pages:

Caching is one of the simple things, which you can do in ease, despite sounding technical it is very essential and crucial in enhancing the user experience. WordPress have a number of caching Plugins, which includes WP Super Cache and W3 total cache. W3 total cache has been most highly recommended for those using content delivery network (CDN) and CDN has an in-built option to activate automatically.

2. Compress HTML, CSS and JavaScript:

This is one of the best ways to reduce your blog loading speed and these are the culprits that make your blog load slowly and test your patience. Compression of Java Script and CSS has proved to reduce the loading time of your blog or website, and the best way to do this, if you are using Word Press is to use WP Minify plug-in.


3. Host your blog on a good and reliable webhost:

If you are thinking that you are wasting money on a good web-hosting domain then you are wrong. The use of cheaper hosting domains can cause frequent failures, which might be discouraging and reduce the performance of your blog causing you to lose regular visitors. Therefore, this is advisable, especially for a new blogger or a webmaster to go for some of the popular web hosting domains like Hostgator, especially if you are using WordPress.


4. Optimize Images:

The time taken for a blog to load turns out to be longer than you would have thought of while using the image. However, many a times you will not feel like deserting some images that looks great on your blog or website. In such cases, it is best to optimize the images for your website and use some image editing tools or softwares like Adobe Photoshop to make the images much more web-friendly. If you are finding Photoshop a bit daunting, then there is automatic online image compression software called Smush.it, which is worth a try.


5. Avoid too many Sripts:

There is a number of Sripts in blog or site which may be tempting for you to use them in your blog or website. However, this is always good to keep the use of Sripts to the minimal amount, and by choosing Sripts that will suit more than one of your needs than choosing separate Sripts for each of your requirement. The lesser the Sripts the lesser the loading speed of your website or blog.


6. Optimize website database:

This is one of the difficult things that you will be doing for reducing the loading time of your website or blog. One of the best ways to do this is not manually, as you may land up frequently with the following error, “database connection error”, even if you are making the smallest of the mistake. So one of the best things to do (if you have wordpress ) is to use the Word Press plug-in WP-Optimize, which does the job automatically without any errors.


7. Use content delivery network (CDN):

This helps to enhance the blog load time that this stores all the static pages onto their servers, and when any visitor comes to visit your website the blog content is served from the server of CDN. This also decreases the bandwidth usage of your current host, and Max CDN has been recommended to be the most affordable until to date.

Monday, 28 October 2013 by Unknown · 0

Saturday, 26 October 2013

Things to Do Before Applying for Google Adsense

Many of you want to make some good money with adsense right? ;)

But it’s not easy to get into adsense program now a days. You have to do few things before applying for adsense.

Google Adsense is world’s larges Ads Network and works at Pay Per Click system. It’s paying rates are better than all of other networks which is the biggest reason it is so popular to all Bloggers and Webmasters. But since everybody is running behind them, they have made the approval system very strict. You make little mistakes and get disapproved every time. So you need a complete guidance and list of thing that you need to do before applying for Google Adsense and supposing that you are ready.

things to do before Google adsense apprval


Privacy Policy :

One of the common mistakes that every Blogger makes Even though there are people out there who say that having a Privacy Policy for a Blog doesn’t makes sense but they are wrong.

A Privacy actually describes to your readers about what they will get on your Blog , what they should do and what they should not. So obviously there is nothing bad in having a Privacy Policy. While it can affect somehow on your Adsense Approval, you must give it a try. You can write it yourself or find Privacy Policy Generators online (You don’t need a lawyer anyway).

About Page:

An About has major role and importance if you don’t want to apply for Adsense. But when it comes to Adsense, they are about Zero chances of getting approved if you are not showing this page.About page simply describes about you and your Blog . This will not only help you establish a relationship with readers but it will also make them trust upon you.

Contact Us Page:

It’s quite obvious that everyone has his/her own opinion. What one of your readers likes may be bothering someone else. Than it is better to give them opportunity to speak up to you and tell how they feel about your Blog, what they want to be edited , what they liked or hated.

It will also show the Google Adsense Team that is viewing your site that you actually care about your readers and not only the money and Adsense.


Name/ Email Verification:

Make sure to put you Name and Email address in some easily visible area like About Me and Contact Us pages. It will confirm to Google Adsense Team that it is the same person who applied for Adsense and not some spam, crappy bots.

Age Verification:

Because Google Adsense is not for under 18 people. So I advice you to be accurate while typing your age.

Minimum Number of Posts:

There is no exact answer. Not even one. Because I have seen very established Blogs with 400+ posts and their owner telling me that Google Adsense is rejecting them while somewhere ,people with 30,40 posts are enjoying making money. Exactly what I said that there is no actual answer.You should only apply after you have more than 550 posts. Posts length should must be 500+ words too.

Design:

Your Blog is the biggest thing after Content. This represents your expertise ,experience and Professionalism. So be careful because anything can kill your Chances.


Content Type:

Be careful with what type of content you are publishing. Because it is something that truly matters. Google Adsense is not for Pornographic, Illegal Items, Drugs or other Blogs / Sites like that. Also Adsense team won’t be willing to allow you to step in if you own a Non English Blog. Having posts shorter than 300 words in length is also Red Signal.

Providing Value:

Don’t complain about not making money and don’t clearly state that your are Blogging for Money only and have no other interest in it. Because this will show them that you will not be providing values to your readers any day. Hence another Red Light glows up.

Other Ad Networks:

If you have any other Ads placed like Chitika, Clicksor or anything, it’s time to drop them off.

Even Google Adsense allows you to use other Ad Networks along with them, it’s better to remove the ads before Applying and don’t put them back until you get a reply from Adsense Team.

Saturday, 26 October 2013 by Unknown · 0

Wednesday, 23 October 2013

Top Reasons to Must Use A Custom Domain for Your Blog


It is usually an obvious fact that most people come into the blogosphere using free blogging platforms such as Blogger, WordPress.com, but when things get serious and you wish to step up the game and making blogging a full or part time job, then you definitely need a custom domain name. 

Using A Custom Domain On Blogger? One May Ask if it is Necessary. Of course, Yes. The necessity of using a custom domain name ranges from promoting your brand through lots of other reasons which I would be outlining here.


custom domain,domain,domain for blog,reasons,how to use,how to,must, use custom,use domain


Monetization of Your Blog:

If you wish to make money blogging, then you need a custom domain. Many Big Advertising-Publishing Companies such as “buysellads” won’t Accept your blogs if it still runs under a subdomain. This would definitely mar their standards and reputation.

Read more »

Wednesday, 23 October 2013 by Unknown · 0

Sunday, 20 October 2013

How to Change The Color of Folders in windows

When You do have a lots of files and data on your hard drive you might need a lot of time to access to the desired file, so the coloring the folders will help you to quickly identify the desired folder among other folders, because it will attract your eyes to making it easier for you to browse folder on windows.

You can Change the color of folder using Folder Colorizer.Its the best program to change Color Folder.

windows,color,color folder,folders


Folder Colorizer is 100% free application will change Color Folder which help you to quickly locate files by ther color folder , and then choose between several colors provided by you favorite program or design new colors of your choice.

The Awesome thing in Folder Colorizer colors that you can apply easily by clicking on the file that you wish to right-mouse clik and then choose the color you wish to apply.

Read more »

Sunday, 20 October 2013 by Unknown · 1

Friday, 18 October 2013

How to Create Short URLs For Your Blog Using Google Shortener


With the rise in the social media, we are continuously seeing people are giving more significance to branding. The branding starts from the Facebook Cover, personalized twitter background, but that’s not all. While sharing anything on their social profile most of the top companies always prefer small URLs instead of Long Tail URLs. For example, BuySellads uses “bsa.ly”. If your site is hosted at Blogger.com, then we have good news for you. To get a slim small URL for your content, there is no need to rely on a Third-party URL shorting services. Fortunately, Google provides a Free-to-use URL shorting service that does the job quite brilliantly. Therefore, today in this article, we will Show How to Create Short URLs for your Blogger.com Blog Posts? 


google,shortner,URL,URL shortner,how to,blog URL,custom domain,domain


Why to use the Google URL Shortener? 

People often share lots of links online. With character limits in tweets, you do not get enough room to say what’s in your mind. In this situation, Small URLs provides you the room to express your thoughts within the same Status update or tweet. Following are the few perks of this service. 

Read more »

Friday, 18 October 2013 by Unknown · 0

Tuesday, 15 October 2013

Install Windows 7 Or Windows 8 From USB Drive [100% Working Guide]


This guide works 100% for Windows 7 and Windows 8 unlike most of the guides out there. The main advantage is that by using USB drive you will be able to install Windows 7 or Windows 8 in just 15 minutes. You can also use this bootable USB drive on friend’s computer who doesn’t have a DVD optical drive.

The method is very simple and you can use without any hassles. Needless to say that your motherboard should support USB Boot feature to make use of the bootable USB drive.


Requirements:

USB Flash Drive (Minimum 4GB) 
Windows 7 or Windows 8 installation files. 

Follow the below steps to create bootable Windows 7/Windows 8 USB drive using which you can install Windows 7 or Windows 8 easily.


Procedure:

1. Plug-in your USB flash drive to USB port and move all the contents from USB drive to a safe location on your system.


2. Open Command Prompt with admin rights. Use any of the below methods to open Command Prompt with admin rights.


  • Type cmd in Start menu search box and hit Ctrl+ Shift+ Enter.
               or
  • Go to Start menu > All programs > Accessories, right click on Command Prompt and select Run as administrator.

3. You need to know about the USB drive a little bit. Type in the following commands in the command prompt:

First type DISKPART and hit enter to see the below message.


windows7,windows8,usb drive,bootable usb,working trick,install windows


Next type LIST DISK command and note down the Disk number (ex: Disk 1) of your USB flash drive. In the below screenshot my Flash Drive Disk no is Disk 1.


Read more »

Tuesday, 15 October 2013 by Unknown · 2

Monday, 14 October 2013

How To Restore Blogger From Backup

This is an open Internet, bad things can happen to anyone even to the professional bloggers. This is why I'm spend most of time in reminding you to take a backup of your blogger blog on a regular basis. No matter how secure framework you got. 


backup,restore,blog backup,blog restore,restore from backup


Why to Restore Blogger From Backup?

Before we work on our tutorial, it is essential for everyone to learn why he should be restoring his blog through Backup. Following are the few meaningful reasons we collected while experiencing blogger for more than 5 years.


Blog Deleted by Blogger: Your blog is owned by Google which means you are not the lone administrator of you site, so Blogger can delete your blog if you violated the content policy. In this situation, you may not get your .blogspot.com site back, but if it is hosted on .com domain, then you might have chances of recovering it. If not on Blogger, then with the help of the backup you can restore it on WordPress.

Read more »

Monday, 14 October 2013 by Unknown · 0

Saturday, 12 October 2013

Alternatives of Google AdSense

Indeed there is no any competitor or alternative to Google AdSense which would allow you to monetize your online content well by minimum effort but if you have lost AdSense, then you can monetize your blog through any other way. There are many PPC programs active in the market but the problem is; most of these pay very little and you can’t earn a decent amount from your blogging efforts. In this post, we will look over some most productive “AdSense alternatives” which can earn a good amount for you and some of these pay even high than AdSense.


alternatives,adsense,google,google adsense,advertisements,blog


Direct Advertisers, the Best AdSense Alternatives:


AdSense pays you the highest among CPC networks and direct advertisers can pay you even more than AdSense. If your blog receives a decent traffic, has a popular niche and has good stats including high PR and good Alexa Rank, then it can attract advertisers. Although dealing with direct advertisers requires somehow harder efforts still if you manage to do it, you can earn an attractive sum. So if you have lost AdSense for some reason, then your top choice must be direct advertisers.


I have seen many blog and website owners who have dropped AdSense and now monetizing their online content with direct advertisers, but it is also a fact that their blogs and websites have touched the heights of success. My own blog also receives a decent traffic but I haven’t accepted direct advertisers yet and I’ll never do as long as AdSense keeps loving my blog. But if AdSense discards me, my first choice will be direct advertisers.


1) BuySellAds – A Major AdSense Alternative


alternatives,adsense,google,google adsense,advertisements,blog,ads,buysellads,chitika,bidvertiser


BuySellAds is one of the most reputed names in monetizing opportunities for bloggers and website owners. It was launched in February 2008 and touched the heights of success in a much shorter time. If your blog or website has attractive stats, then you can earn a decent income through BuySellAds. It connects you with direct advertisers and the advertisers will decide either they show advertisements on your blog or not. BuySellAds charges a small amount from your earnings which you charge from advertisers.

Although BuySellAds is one of the best AdSense alternatives, but it doesn’t approve blogs and websites easily. While approving any blog or website, BuySellAds looks over the traffic stats, PR and age of the concerned website critically. Once your blogis approved by the service, it starts generating a good amount. The minimum payout at BuySellAds is $50 which is delivered to the publisher through either PayPal or check.

2) Tribal Fusion, Yet Another AdSense Alternative

alternatives,adsense,google,google adsense,advertisements,blog,ads,buysellads,chitika,bidvertiser


TribalFUSION is yet another big name in the world of advertising. Like BuySellAds, TribalFUSION also approves websites and blogs strictly. Once your blog gets approved by TribalFUSION, you will get a very good CPM. The minimum payout limit is $100 through either bankwire transfer or check.

Read more »

Saturday, 12 October 2013 by Unknown · 0

Wednesday, 9 October 2013

How to Remotely operate a computer with Team Viewer

Lots of computer software and hardware companies using team viewer to assist there clients to get rid of problems. Team viewer is a software through which you can remotely operate a computer system by sitting anywhere else on other computer system.

You can use team viewer to remotely access your friend's computer system.Is it secure..?? yes it is.. because no one can access your pc till (S)he has your id and password. and password changes everytime you open team viewer.


What is team viewer:

It is a Remote desktop utility. by using it u can remotely access any computer by sitting on your computer system.both parties connect to a server which sets up a session between both.

How team viewer works:
  • One person opens up teamviewer and calls person B. 
  • Person A gives the ID and password to person B. 
  • Person B puts this information in teamviewer and hits connect. 
  • now person B can access person A computer. 


Requirements to use team viewer:
Directions to use team viewer :
  • Open team viewer 
  • Inform second party to open it too. 
  • Ask them there team viewer id and password (password changes every time you open team viewer) if you want to acces there system or give them your password and id to allow them to access your computer system. 
  • type in there id and password. if you want to access there computer system. 
  • Click on " Connect To Partner " 
  • now you are all set to access second party computer system.
>> Click to Download Teamviewer_manual.pdf  <<

Wednesday, 9 October 2013 by Unknown · 0

Sunday, 6 October 2013

How To Get New Design Facebook Home Page 2013

Facebook is changing its layout to a very awesome layout , which will surely attract the hearts of users.There will be new bright and beautiful stories instead of these boring.The new look is totally different from the old one , it contains all the features which was in the old one , however the extra features which was not in use at all has been removed.This new design will be announced soon for iPad , iPhone and Android etc.For Getting the new look of Facebook , you should get into the waiting list to be update,whenever facebook started this look , they will surely notify you to feel and enjoy the new look.For getting admission in the waiting list follow the below easy steps.


new-facebook,timeline,facebook-timeline,fb-new-look,new-look-of-fb


Steps To Get New Design Facebook Home Page 2013
  • Click on this LINK
  • Now this link will redirect you to the Facebook Feeds . 
  • There Scroll to the bottom and click on "Join Waiting List" button . 

 May be this timeline of  Facebook become more secure and less spammy then the old version . 

I hope you will love the new look of Facebook , share this trick with your friends and enjoy the cool new look of Facebook .. Feel free to give your comments...... 

Sunday, 6 October 2013 by Unknown · 0

Wednesday, 2 October 2013

How to Download Torrent File Through IDM

Hello friends, today I am going to show you a amazing trick about to download torrent file using Internet Download Manager (IDM). This tricks is very helpful for slow internet user. Please don't mean that the tricks does not needed for high speed internet user. The best things is that it save your data loss i.e. if you use Bit-torrent or utorrent your data will loss for upload.

As we all know very well that the torrent runs on its own server so that some time it give less speed. But today I am going to show you how to download torrent file through IDM . It’s very easy just follow some steps, I will show you how you can do So, to download torrent file using IDM, follow the steps below... 

Read more »

Wednesday, 2 October 2013 by Unknown · 0

Saturday, 28 September 2013

How to Download All Your Facebook Information

By now you have been using Facebook for years and years. So, of course, you have a lot pictures, emails, videos and messages stored in your account. Some people use Facebook as the primary mode of archiving their personal data. This can be dangerous because there are instances where people are hacked or banned from Facebook. Losing this precious data would be devastating. 
facebook,facebook trick,download,facebook download,fb,fb trick,fb download,fb image
Facebook has the ability to archive your data.
1. Open the Account Settings menu.
2. Click Download a copy of your Facebook data.
3. Choose Start My Archive.
4. You should receive a security message indicating that the archiving process has started.
5. Use the email to download all your data.

Read more »

Saturday, 28 September 2013 by Unknown · 0

Wednesday, 25 September 2013

How to Reset - Remove - Bypass a BIOS or CMOS Password without using any Software

BIOS passwords are used to add some extra security to computers. You can either Set a password to prevent access to BIOS settings or to prevent PC from booting.But sometimes this extra security might become a pain when you forget the BIOS Password or someone changes your system BIOS password intentionally.But there is no need to worry. 

There are many known ways to reset / remove / Bypass the password:

  • By removing the CMOS battery 
  • By using the motherboard jumper 
  • By using MS DOS command 
  • By using Backdoor BIOS password 

By Removing the CMOS Battery:

Almost all motherboards use a small coin sized CMOS battery to store all BIOS Settings along with the password. To reset the password, unplug the PC, open the Cabinet and remove the CMOS battery for approx. 15-30 minutes and then put it Back.

How to,reset,remove,bypass,bios,cmos,password,working,software,battery,cmos battery,custom


It'll reset all BIOS settings as well as the password and you'll need to Re-enter all settings.If it fails, then try to remove the battery for at least one hour.

By Using the Motherboard Jumper:

Almost all motherboards contain a jumper that can clear all CMOS settings along With the BIOS password. The location of this jumper varies depending upon the Motherboard brand. You should read your motherboard manual to check its Location. If you don't have the manual then look for the jumpers near the CMOS Battery. Most of the manufacturers label the jumper as CLR, CLEAR, CLEAR CMOS, Etc.When you find the jumper, look carefully. There will be 3 pins and the jumper Will be joining the center pin to either left or right pin.

Read more »

Wednesday, 25 September 2013 by Unknown · 0

Monday, 23 September 2013

How to Hide Files in JPEG Pictures

If you’re looking to hide files on your PC hard drive, you may have read about ways to encrypt folders or change the attributes on a file so that they cannot be accessed by prying eyes. However, a lot of times hiding files or folders in that way requires that you install some sort of software on your computer, which could then be spotted by someone else.

Here I’m going to show you a new way to hide files that is very counter-intuitive and therefore pretty safe! Using a simple trick in Windows, you can actually hide a file inside of the JPG picture file

Hide,hide picture,jpeg,jpeg picture,hide files in picture,hide in image


You can actually hide any type of file inside of an image file, including txt, exe, mp3, avi, or whatever else. Not only that, you can actually store many files inside of single JPG file, not just one! This can come in very handy if you need to hide files and don’t want to bother with encryption and all that other technical stuff.

Hide File in Picture:

In order to accomplish this task, you will need to have either WinZip or WinRAR installed on your computer. You can download either of these two off the Internet and use them without having to pay anything. Here are the steps for creating your hidden stash:

Read more »

Monday, 23 September 2013 by Unknown · 2

Saturday, 21 September 2013

How to Change Windows 7 Logon Screen


Are you bored with the same log screen daily. Here is the trick to change that screen image. Just follow the instructions:

1.Open run mode (i.e windows key + R)
2.Then type regedit and hit enter

Now navigate to


HKEY_LOCAL_MACHINE\SOFTWARE\Microsoft\Windows\CurrentVersion\Authentication\LogonUI\Background 


Change value of OEMBackground to 1. ( double click OEMBackground and change the value 0 to 1) 


change,change logon screen,windows 7,windows logon screen,change windows logon


Now open the path C:\Windows\System32\oobe\info

And create a new folder with the name “backgrounds” 
(i.e C:\Windows\System32\oobe\info\backgrounds) 

Now copy paste your own image to this folder and rename the image to “backgrounddefault.jpg”

Read more »

Saturday, 21 September 2013 by Unknown · 2

Monday, 16 September 2013

Chronicle Free Responsive Blogger Template

Chronicle is a highly responsive, clean and SEO friendly template for Blogger which was originally adapted from WordPress. The theme was developed for WordPress by Alex at KolaKube with thesis framework. Due to its highly responsive structure, the template adapts any screen resolution giving your blog a beautiful look.

Chan Deep of BlogTipsandTricks has converted Chronicle WordPress theme for Blogger platform. Thanks to him, he distributed this template for free after converting it. So you can download this template for free and can use on your Blogger blog.


blog,blog template,premium template,chronical blogger,free,responsive


  • Highly responsive nature 
  • Clean and cool layout 
  • Simple 
  • Attractive checked background 

Read more »

Monday, 16 September 2013 by Unknown · 0

Sunday, 15 September 2013

5 Quick AdSense Approval Tricks

Although great Google can’t be tricked, still there are some important practices which can help you in getting an approved AdSense account quickly. Several bloggers and website owners face difficulty in their AdSense account approval, so I decided to share some important tips which will increase the chances of AdSense account approval. 

Before reading this article, please keep this in mind that we don’t know and share any secrets related with AdSense and this article is based only public talk. 


adsense,google,google adsense,approval,tricks


Site Theme / Topic Comes First:
Your blog’s niche, theme or the topic is most important in deciding either Google approves your account or not. AdSense is a serious business and it promotes products of companies and individuals on targeted websites and blogs. If your blog or website doesn’t have a well defined theme, then AdSense is most likely not going to approve your account. So before applying for AdSense, ensure that your blog defines a topic clearly. For example you can create a blog about health tips and share content only related to health on your blog. 

Sometimes, even blogs and websites with well defined theme are not accepted by AdSense. It happens when the topic of the blog is not much popular or doesn’t have any business scope. If same is the case of your blog, you may need to change the entire niche of your blog or website if it is in its initial stage or try any AdSense alternative. 

Site Structure:
The second most important factor, which may prevent AdSense to approve your account, is bad site structure. Sometimes blogs and websites are not designed well. Both navigation and internal linking are important. To ensure that AdSense approves your account quickly, first design your blog cleanly. i.e. develop a good and easy navigation and build a good internal linking structure.

Read more »

Sunday, 15 September 2013 by Unknown · 0

Saturday, 14 September 2013

Scroll to Top Button for Blogger Blogs

A scroll to top button on your blog makes it easy for your visitors to scroll to the top of the page. The scroll to top widget, which I am sharing with you, is easy to add and you can add it within a minute to your Blogger blog. This button appears only when your visitor scrolls below from the top and it hides itself when your visitor is at the top of the page. The smooth scroll gives a cool look to your blog. Speed of the scrolling also varies and increases from top to bottom. 

widget,free widget,blog widget,top button,top,scroll button,scroll


The widget counts divs in your template and recognizes that where your visitors is currently on the page. After this, the speed of the scroll is determined. Suppose your visitor presses “Scroll to Top” button from the middle of the page, then the page slowly scrolls up. Alternatively, when a visitor presses the button from extreme bottom of your page, the page will scroll up at a higher speed. All these features make this button unique from a common button which rapidly takes you to the top when you press it. To add this cool button to your Blogger blog, follow the below simple steps:

1. Login to your Blogger dashboard 

2. Select your blog and go to its layout 

Read more »

Saturday, 14 September 2013 by Unknown · 0

Friday, 13 September 2013

JPStation Free (Responsive) Blogger Template


JPStation is a free but feature rich and premium quality responsive template for Blogger which has been adapted from WordPress by IVYthemes.com. It is one of the best Blogger templates which I have ever found. Traditionally, Blogger is less diverse in providing feature rich templates and most of the popular Blogger templates are commonly adapted from WordPress. 

JPStation is one of those templates which are beautiful and feature rich at same time. 


JPStation Blogger template is loaded with a lot of features. Some of these features are listed below: 
  • The template is fully responsive 
  • Tabbed widget on sidebar lists popular posts, latest posts, comments and labels in one place 
  • Clean background makes it easy for your visitors to read text 
  • Brilliant look of the template gives your blog a professional look 
  • The template is light and loads quickly 

Read more »

Friday, 13 September 2013 by Unknown · 0

Wednesday, 11 September 2013

2 States : The Story Of My Marriage by Chetan Bhagat

Wednesday, 11 September 2013 by Unknown · 0

Tuesday, 10 September 2013

RBI website to detection of fake currency :)

Seeking to spread awareness among public about fake notes, the Reserve Bank has launched a website explaining ways to detect counterfeit notes.


With a tagline 'Pehchano Paise Ki Boli, Kyunki Paisa Bolta Hai', the website 
gives visual presentation with pointers on currency notes of 10, 20, 50, 100, 500 and 1,000 rupee denominations

Tuesday, 10 September 2013 by Unknown · 0

Thursday, 5 September 2013

Generating Electricity From Water

Innovation : Generating Electricity From Water


myFC Power Trekk charger uses water as a source for creating electricity. The device based on the Fuel Cell technology and can produce electricity power by itself.


Source: Best Selling Products On Amazon

Thursday, 5 September 2013 by Unknown · 0

Wednesday, 4 September 2013

What happens on the web in 30 seconds !


-20,400 GB of global IP data transferred.
-70+ BotNet Infections.
-12 New victims of identity theft.
-3+ New Wikipedia Articles published.
-102 Million Emails sent.
-700 new Mobile Users.
-25.000 App downloads.
-$45,000 sales on Amazon.
-31,141 hours of music played on Pandora.
-55+ New linked in Accounts.
-Over 10 Millions photo.
-Views, 3500+ Photo uploads on Flickr.

Read more »

Wednesday, 4 September 2013 by Unknown · 0

Monday, 2 September 2013

How to Stop Spam Comments and Spam Traffic to Blogger


How to Protect Your Blogger Blog from Spam Comments and Spam Traffic:


When your blog is subjected to spam comments and spam traffic, its performance greatly reduces. It is also possible that Google may kick it out from the ranking competition when it is harmed or invaded by spam comments. The spam spiders and bots keep crawling your blog all the time and as a result, its load time dramatically increases. So it is extremely important that you must take affective steps to protect your blog from spam attack by stopping spam comments and traffic flow which is mostly caused by your own mistakes.


From Where Spam Traffic Comes?


Spam traffic comes from spammy websites which find your URL somewhere on the web. It mostly happens when you place your blog’s link on a spam website. In case of Blogger blogs, when your blog starts receiving spam traffic, you can notice it in your Blogger dashboard as Top traffic sources.

In your blog’s case, there may be some sites like Facebook, Twitter or any friend’s blog also if your blog is new. But if you notice a strange site, then you must check it out by searching information about the site in Google that either it is a reputed one or spam.


So What to Do if Your Blog Receives Traffic from a Spam Site 

Spam sites send traffic (bots) to your blog when URL of your blog is placed anywhere on that sites. In such a case, find out the exact URL from where traffic is coming. In most cases, the URL is placed there by yourself. Most bloggers do this and place their blog URL for getting a backlink without knowing or caring about the site. If you believe that you haven’t placed the URL there, then contact the administration of that site and request them for removal of the link. In most cases, it works and your link is removed. 

Read more »

Monday, 2 September 2013 by Unknown · 0

Sunday, 1 September 2013

How to Receive AdSense Earnings Through Western Union


Western Union is the most popular money transfer service.Google AdSense is popular blog and website monetizing program which lets publishers earn money through their blogs and websites.Western Union is the one of the way of receiving AdSense earnings in the country.


Although Google sends checks of AdSense earnings by standard mail, but they take long to reach the publisher and several other risks including risk of misplace are also there. In such a situation, Western Union Quick Cash is the only option left behind as Google doesn’t process AdSense payments over PayPal or any other fast service. A good thing about Google is that it isn’t charging any money from AdSense publishers for processing their earnings via Western Union and publishers can collect their earnings without paying any fee.


Google issues payments each month if the minimum thresh hold of $100 reaches. The earnings are calculated and verified by 7th of the next month and are commonly issued between 22nd-28th of the next month. When AdSense sends your earnings, you are given a Money Transfer Control Number (MTCN) which can be found in AdSense account by clicking Details link in dashboard.


When the money transfer initiates, your earnings are moved above Recent Payment. Now you can view the details by clicking Details link to see either the transfer has completed or not.


Before completion, you will unable to see the MTCN and you will see Payment in Progress status.

Read more »

Sunday, 1 September 2013 by Unknown · 7

All Rights Reserved Breaking Tricks
Powered by Blogger